Repair Rigid Flex Circuits
The durability and flexibility of rigid flex circuits make them an essential component of many electronic devices. As such, they are also prone to damage and require regular repair. However, the process of repairing a rigid flex circuit is different than repairing other PCB types. To successfully troubleshoot and perform a repair on a rigid-flex circuit, it’s important to understand the specific challenges involved. This article will delve into the various types of damage that can be caused by rigid-flex circuits, explore some common repair methods, and highlight the factors that are critical to success.
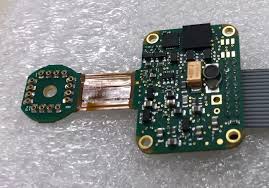
The fabrication of a rigid flex circuits begins with a one or two-sided flex layer, either pre-laminated or unclad with PI film. It is then laminated to a rigid panel or substrate using an adhesive system. Alternatively, the copper can be directly plated to this rigid surface using an adhesiveless cladding process. Once the flex is plated, it is then drilled, etched, and plated again in much the same manner as a traditional 2-sided rigid board core.
A flex circuit may also be designed with additional coverlay layers, which act as a solder mask. This can be achieved by applying an additional polyimide film with an adhesive, or a photo-imageable solder mask material which can be printed on the flex section using a screen printing method. This allows for easy identification and location of components on the flex circuit, as well as the rigid board sections.
How Do You Repair Rigid Flex Circuits?
Rigid flex circuits are more hygroscopic than other PCBs, which makes them susceptible to moisture damage. To avoid this, proper storage and climate control are required to minimize moisture levels. In addition, flex circuits can be more sensitive to the reflow soldering temperature, so careful reflow and oven management is required.
a) Solder Track Repair: Solder tracks can be damaged on a flex circuit, and they must be repaired to re-establish electrical contact. One way to do this is to use conductive paint to bridge the gap, which is then cured to form a conductive path. Conductive tape can also be used to repair traces, though it is essential that all necessary steps are taken to ensure that the resulting repairs are reliable.
b) Connector Replacement: Depending on the type of connector that is broken on a flex circuit, it may be possible to replace it by desoldering and soldering in a new one. This requires careful work to prevent damage to the flex circuit and to ensure that the replacement connector is a good match to the original design specifications.
c) Delamination Repair: Whether caused by moisture or physical stresses, delamination of a flex circuit can be difficult to correct. It is critical that the repair process be executed with great care to minimize the amount of adhesive needed, and to ensure that all layers are firmly attached. If the damage is severe, it may be necessary to consider professional intervention or replacement of the entire circuit.
Rigid-flex circuits are a complex and challenging part of electronic assemblies, and they must be handled with care. Choosing the right tools, ensuring that all components, solders and adhesives are of high quality, and executing the repair with precision are essential to successful repairs. If you are not experienced with working on rigid-flex circuits, it is best to seek out the services of a professional PCB repair technician.